Search This Blog

Friday, September 4, 2015

Faux Mirrored Vanity

So living six people in a single wide mobile home is a bit crowded. We keep trying to find ways to save space. One of the ways involved remodeling the master bath, removing the double sink and installing a smaller one. Seriously, if you can't share a sink with your husband, why are you married to him?

I have always loved the look of the dressers that were re-purposed into vanities, so for a few years I had been in search of the perfect, solid dresser, with carved legs and moulding to use for a new vanity.

Then I found this beauty.

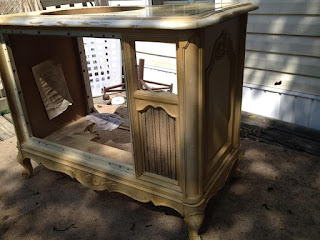
I wish I would have taken pictures before, but this... was a console TV. I found it in an old house that all the contents were being auctioned off and paid someone the ridiculous price of $20, which included delivery to my house.

My son actually took all the guts out of it while I was at work, so explains why I never got a before picture. Then my husband bought a sink and used the template to cut part of the top out.

I choose to have the sink centered around where the cabinet doors were going to be. It also gave me a greater space to set things to the right of the sink.

After seeing a few people's projects on Pinterest with the mirrors, I have been in love, but I couldn't do that with this console. There weren't any flat squares to work with, so I saw a project for a faux mirrored finish and the idea sparked.

I bought Rustoleum brand spray paint in Chrome. I applied three coats of spray paint and let it dry.

Then I applied Minwax water based polycrylic gloss finish and let it dry.

Soooo Beautiful!! Then we added the doors and installed it.


This is an unfinished bathroom remodel, but we are one step closer and I adore this sink!!!!


Monday, November 4, 2013

Homeschool challenge

Today starts Day 1 of me homeschooling my 6yr old son. I have always known that homeschooling is a good thing, but so is the experiences that come from school and peers. Thanks to our state blindly adopting Common Core, I have had to rethink my responsibility as a parent and teacher. You see, this decision bears a lot of weight for my husband and I as we work for the public school system. I am most concerned with our youngest two as common core standards require reasoning and abstract thought, from children who are incapable since this does not develop until around age 11. This isn't something you can teach them, their frontal lobes have not developed, it is impossible. My decision to pull my son came after his first quarter grades were significantly lower than the last few years. (Yes, I sent him to pre-school.) Today had been fantastic aside from the fact I really need a new desktop computer and had to use my precious laptop that is only reserved for Mom's college work.

Thursday, October 31, 2013

Training up children

I recently purchased a book called Cleaning House: A Moms 12 Month Experiment to Rid Her House of Youth Entitlement by Kay Wills Wyma. I have been working on phase 1, teaching them to make their beds and pick up everything on the floor in their rooms. 

While my children's rooms are such a mess, we are into day 3 and they are still slowly progressing to getting it all cleaned up. However, I went about it in a different way. 

I took all their chores away except taking care of all the animals and gave them this one BIG chore. They have to pick up after themselves. This includes, nothing of theirs on the floor in any room of the house, making their bed, and putting their own dishes directly into the sink or dishwasher. I now have to do all other chores such as cleaning the bathroom and dishes (you know, all the things I was having to go back and do anyways) but this has really made my life easier. 

For three days know the living room floor had been free from clutter. I can vacuum the hall without cleaning it, and cleaning the bathroom is a lot quicker when I don't have to pick up all the bath toys and clothes. 

The catch? Each child now has a reward chart posted outside their bedroom door. It is individualized for them with their goal written. They each get $1 for each day their beds are made and "chore" done. So far so good, but my 13 year old didn't make her bed today so that's one less dollar for that flat screen TV she is saving for.

Sunday, August 18, 2013

Leisure Bra DIY

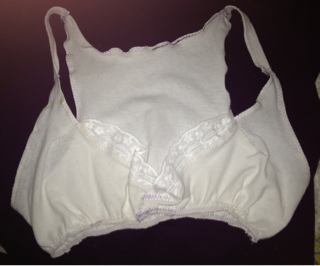
More than eleven years ago, I bought a leisure maternity bra at Wal-Mart and absolutely loved it. Finding them now is like pulling teeth, so I decided to try my hand at making one out of my sons old white T-shirts. (Said t-shirt was in box to donate) I used one of my favorite tank tops to trace a pattern.

I wanted it to crisscross in the front as my old one had done, so here is the pattern I came up with.

Note the stain on this tee. I managed to avoid it. I also cut off the bottom hem to use as my straps.

I sewed the pieces together with a zigzag stitch and sewed a thin piece of elastic using the same stitch. I added a small bit of lace as well to make it pretty. 

Not the prettiest, but homemade under clothes! Kinda excited and will probably work on other variations of this. 

Sunday, August 4, 2013

Target deals

Had I not been so busy trying to prepare for a shopping trip to Target, I would have shared this yesterday when it would have been a little more useful. Target has a new app called Cartwheel. You have a set number of "spaces" (I have 13 right now) to fill with offers from Target. Whatever offers you select will be applied with the barcode on you app. This is really awesome because you can stack Cartwheel savings with Mobile coupons AND manufacturer coupons. For example, Up and Up glue and crayons were on sale, plus Cartwheel had a % off deal, plus a mobile coupon for $1 off 4. This made them free. I haven't had time to research a lot of offers, but this looks to be a really good deal! One more week of full time employment. Let the savings begin..

Wednesday, July 24, 2013

The Ruffled Party Dress

I recently decided to make my daughter a dress. I was inspired by the ruffle backed dresses on Pinterest, however, they were jersey knit and I had this wonderful material I was planning on using. 

For the main design of the dress, I borrowed the pattern from The Cottage Home blog found here: http://thecottagehome.blogspot.com/
2011/01/party-dress-printable-pattern-and.
html?m=


Old Painted Window

When we tore down the old farmhouse, we salvaged several old doors and windows to upcycle. Here is the first craft I made with one of the old windows.

 I simply picked a font I loved on Word and typed what I wanted it to say.

 I carefully taped it to the back of the window, facing through the glass.

 Flipped the window over and traced over the words with black paint and a teeny tiny paint brush.

 After it dried, I sealed it by spraying lightly with Modge Podge. We found an old piece of chain and screwed it to the back to hang.

 Since I already had the window, the paint brush and the paint, this project cost me $5 for the Modge Podge.

Positively Prudent!